
Blog
11 Ways to Screw Up an ERV Installation – GreenBuildingAdvisor
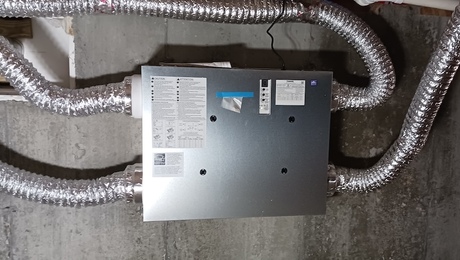
How many ways can one screw up an ERV installation? Surprisingly many, as it turns out. And to look at their work, it seems that some installers think that maximizing those installation errors is the goal. I’ll get into the details in a bit, but before I do, take a good look at the first two photos here. How many problems do you see with this ERV? Before continuing on, write down your number. (Hint: It’s not the number in the title.)

Terminology first
Because we’re going to have to discuss ducting, let’s get on the same page with terminology before we do so. I’m going to use the four names that Zehnder uses for the two air streams with four different conditions.
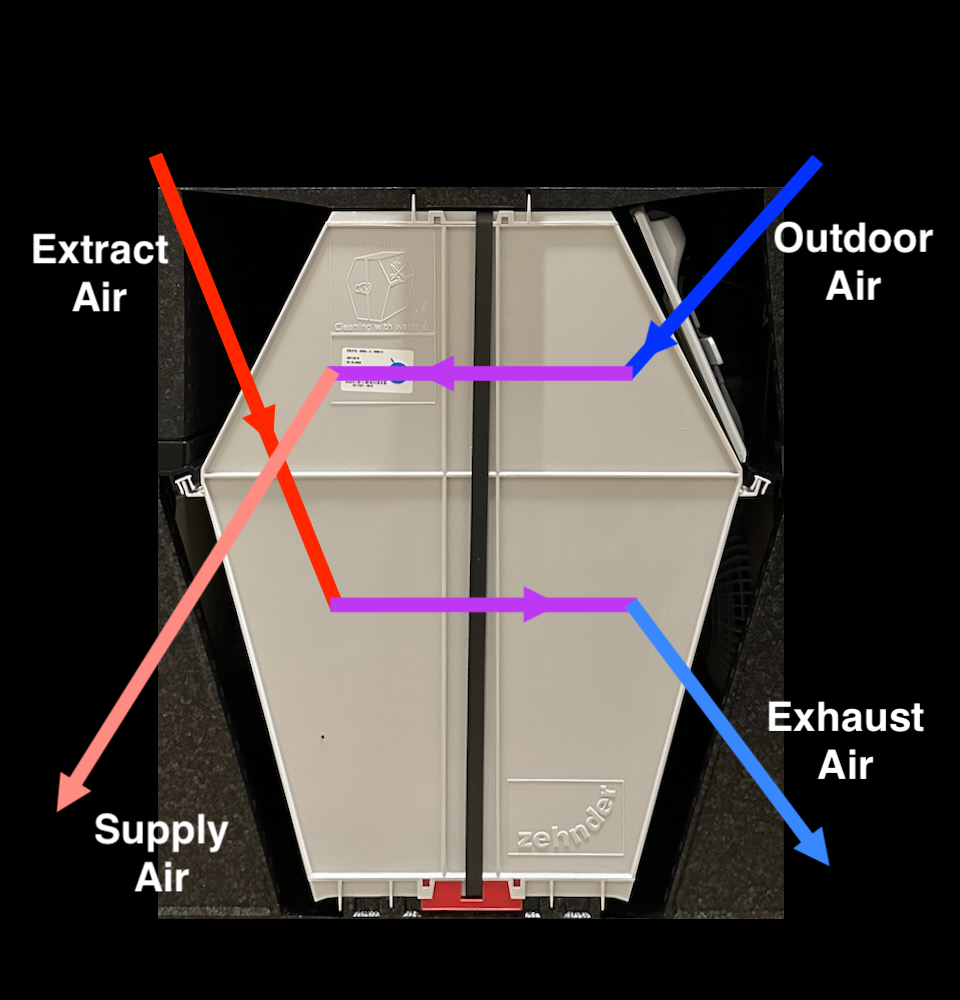
The photo above shows the air being pulled from indoors (extract air) and the air being supplied to indoors (supply air) on the left side. Those are both relatively close to room temperature. When the ERV and ducts are in conditioned space, the ducts for those two parts of the airflow don’t need insulation.
The air being pulled from outdoors (outdoor air) and the air being sent outdoors (exhaust air) are on the right side. Those are both close to outdoor temperatures. In winter, then, the ducts carrying them will be very cold. When the ERV and ducts are in conditioned space, those two DO need insulation. Otherwise, condensation will be dripping from them.
The problems with that installation
First, you can see fiberglass insulation between the floor joists above the crawlspace in the second photo. That means the crawlspace is unconditioned. Robert Jordan of Achieve Home Energy Advisor sent me the photos and told me that the crawlspace is indeed unconditioned. That will destroy the efficiency of the heat exchange that happens inside the unit. And the next problem only makes it worse.
Second, there’s no insulation on the ducts. Normally the outdoor and exhaust air ducts should be insulated to prevent condensation. Depending on the crawlspace conditions, condensation may not occur here. The extract and supply air ducts do not need insulation when installed in conditioned space. And that’s where they should always be installed. In unconditioned space, those ducts will lose a tremendous amount of heat on cold winter days. Even insulated ducts won’t solve the problem, though.
Third, did they really use dryer vent? Are you kidding me? Come on! At least use the right kind of flex duct.
Fourth, the (incorrect type of) ducts are installed very poorly. The ducts coming off of the ERV itself need to run straight for more than 24 in. before making the air turn. That’s in the manufacturer’s installation instructions. None of the four ducts meets that requirement. And that immediate 180° turn on the top right is brutal for airflow.
Fifth, flex duct needs to be pulled tight. When allowed to hang with all that slack, the resistance is too high for good airflow.
Sixth, they should have used larger ducts. The takeoffs on that ERV accept either 4-in. or 6-in. ducts. That dryer vent is 4 in. in diameter. This ERV is rated for a maximum of 100 cubic feet per minute (cfm). To get 100 cfm out of a 4-in. duct would require a velocity of 1,146 feet per minute. Those 4-in. ducts would have to be installed nearly perfectly and kept as short as possible to do that.
So I see six ways to screw up an ERV installation here. There could be more, though. How many did you find? If I missed some, let me know in the comments.
Tips for a good ERV installation
Let’s turn this around now and write these as a list of things to do rather than ways to screw up an ERV installation.
- Install the ERV in conditioned space. This is an absolute must. For the heat exchange to work, the ducts on the house side (supply and extract) have to lose pretty much no heat. None!
- Both ducts to the outdoors (outdoor and exhaust) must be insulated. That’s because they get very cold in winter and will be a condensation risk if they’re not insulated.
- Use proper duct materials. Rigid duct is best. Flex duct is an approved material for this application. Dryer vent is not.
- Use best practices for duct design and installation. Ducts should have as few turns and fittings as possible. Some duct fittings are better than others, so understand the concept of equivalent length and make sure you keep it low. Good duct design is both a science and an art.
- Follow the two rules for good flex duct installation. If you don’t know what they are, check out my article “The Joy of Flex.”
- Embiggen the ducts. Smaller ducts mean higher velocity. Higher velocity means more resistance to airflow. More resistance means lower airflow. Go big for good airflow!
- Be careful about placement of the intake and exhaust terminations outside the house. Keep them separated to prevent pulling in air that you just tried to get rid of. Don’t put the intake near sources of contamination (e.g., asphalt shingles, exhaust vents, garage). And make sure the intake is accessible because you’ll need to clean it occasionally too.
- Know what you’re doing if you connect the ERV ducts to the heating and cooling ducts. By making that connection, you’ve got two fans that might end up fighting each other. And the ERV usually loses that battle.
- Make sure the ERV is accessible. It needs to be commissioned and get regular filter changes.
- Start with a good design. We have six HVAC designers here at Energy Vanguard who work on ventilation designs every week. If you need help, contact us.
- Commission the system. Even if you’re installing from a good design, you still need to measure and adjust the airflows. One of the big advantages of ERVs is that the amount of air going into the house equals the amount of air being exhausted. But that’s not an automatic outcome, at least for most ERVs. You have to make it happen.
What tips do you have that I missed? What problems have you found in the field? Let me know in the comments, because we need to get this information out there. Energy-recovery ventilators are too expensive and too important to be treated like cheap bath fans.
Allison A. Bailes III, PhD is a speaker, writer, building science consultant, and the founder of Energy Vanguard in Decatur, Georgia. He has a doctorate in physics and is the author of a bestselling book on building science. He also writes the Energy Vanguard Blog. For more updates, you can follow Allison on LinkedIn and subscribe to Energy Vanguard’s weekly newsletter and YouTube channel.
Weekly Newsletter
Get building science and energy efficiency advice, plus special offers, in your inbox.