
Blog
Testing Homes for Air Leaks – GreenBuildingAdvisor
Editor’s note: This article originally appeared in Fine Homebuilding Magazine, Issue 86, way back in February/March of 1994. Much of what we discuss today about air tightness and blower door testing was figured out long before the IECC code requirements.
To reduce the amount of energy used in heating and cooling their homes, most people focus on adding insulation. But controlling air infiltration is more important. Airtight homes cost less to heat and cool and are more comfortable to occupy (as long as the homes are equipped with mechanical ventilation systems). Airtight homes are more durable too. In leaky houses, moist, heated air escapes to cooler areas, such as insulated walls and ceilings, and the vapor condenses, causing mold, mildew, rot and other moisture-related problems.
Still, few builders know how tight the homes they build are or where the major leakage occurs. A blower door test can provide a builder with this information. In this article, I’ll explain what’s going on when an energy consultant or an insulation contractor does a blower door test. I’ll also explain how to do the test in case you’re a builder who specializes in energy efficient construction and are considering buying a blower door.
Enter the blower door
Houses leak air because of the difference between indoor and outdoor air pressures. A blower door places a home under a known, elevated pressure and then measures how much airflow is required to maintain the pressure difference between the indoors and outdoors. The tighter the house, the less air the blower door must move to maintain a given pressure.
Blower doors were first developed in Canada and Sweden as research tools, but their use by builders, insulation contractors, and weatherization crews is gradually increasing. In new construction, for example, a blower door is a quality assurance tool, enabling the crew to measure the effects of their air-sealing efforts and to see where they’ve succeeded and where they have further work to do. In existing buildings, the blower door testing process can determine the potential for savings through weatherization and can direct the weatherization crew to the leaky areas.
Components of a blower door
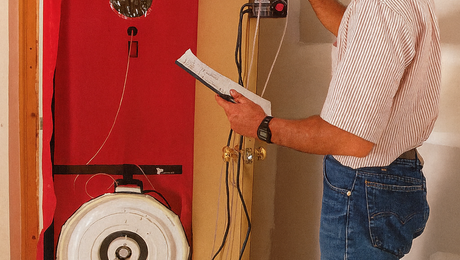
Portable, rugged and affordable blower doors have been around for more than a decade. Today, a typical blower door consists of a fan, a frame-and-panel assembly that fits into an exterior door opening and some instrumentation. My Minneapolis Blower Door from the Energy Conservatory includes a 20-in. diameter, variable speed, reversible 3/4-hp fan, an aluminum frame and a fabric panel. I drape the panel over the frame and adjust its lever-operated cams so that the assembly fits tightly in an exterior door opening. Weatherstripping around the blower door frame makes a tight seal. Then I slip the fan housing into an elastic-rimmed opening in the blower door panel.
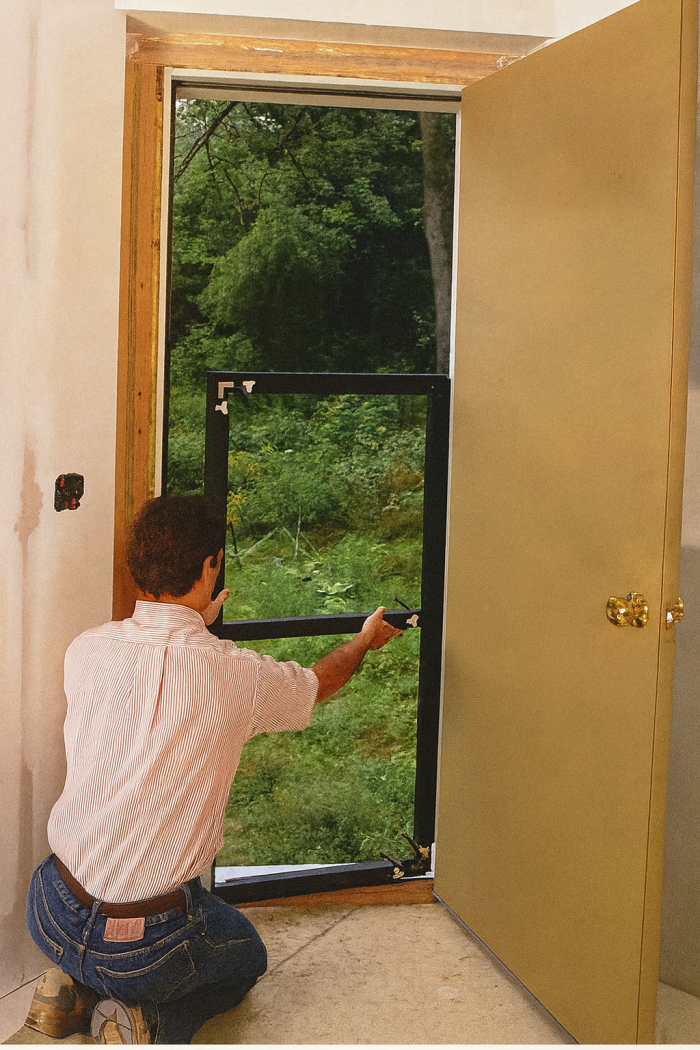
Once the blower door is installed, I mount the fan speed controller and the instrumentation that measures air pressure levels (I use a digital manometer) nearby, often clamped to the open door. A tube runs from the manometer to the fan housing, and another runs through the blower door panel to the outside. The manometer enables me to measure the pressure difference between inside and outside, as well as the pressure across the fan, which correlates with the airflow rate.
Houses vary tremendously in how tight they are, so the amount of air that a blower door fan has to move to maintain a given pressure difference also varies. Therefore, fan housings are usually designed so that you can reduce their flow area (the size of the fan opening). Retrotec makes a blower door that has a low-flow plate with a number of holes that can be plugged for testing tighter homes. My Minneapolis door has three concentric low-flow rings that snap into the fan housing, giving a choice of four ranges in all. The rings allow accurate measurement of flow rates ranging from 100 cu. per minute (CFM) to 6,000 CFM, a typical range for blower doors.
Performing a test
Before turning on the fan, I quickly prep the house for a blower door test. I close all exterior windows and doors but leave interior doors open (doors to the basement may be left open or closed, depending on the goals of the test). I turn off combustion appliances, exhaust fans, dryers, air conditioners, etc. I close fireplace dampers and doors. I may tape off certain intentional openings, such as the exterior hood of a heat recovery ventilator (HRV), so that the house doesn’t appear leakier than it really is.
If a breeze or strong temperature difference between inside and outside is creating a difference between indoor and outdoor air pressures, I adjust the pressure gauge to read zero. This adjustment takes the weather conditions into account and allows me to measure accurately the house pressure.
Many weatherization crews conduct a quick single-point test at 50 Pascals (a Pascal is a metric unit of pressure—6,895 Pascals is 1 psi). The test tells them whether the house is leaky enough to justify the cost of air-sealing it (making a home super tight).
A more accurate test, and the one I do, is a multi-point depressurization test. I bring the fan speed up slowly, depressurizing the house to 60 Pascals below the outdoor pressure. I note the fan pressure in Pascals. Then I slow the fan, bringing the house pressure to 50 Pascals, and record the fan pressure. I continue to repressurize the house to 40, 30 and 25 Pascals, noting the fan pressure at each point.
When I am through (it takes about three minutes to do the test), I enter the data along with the indoor and outdoor temperatures, the volume of the house, its exterior surface area and the number of stories, into the blower door program on my portable computer. The program also asks whether the house is sheltered, exposed or average in terms of its exposure to the wind.
The computer then displays the natural air-change rate for the house based on three different measurements. First, it calculates the CFM50, which is how many cubic feet per minute of air the blower door moves to maintain a 50 Pascal differential between indoors and outdoors. Older homes typically range from 2,000 to 4,000 CFM50, although some exceed the 6,000 CFM50 capacity of the blower door, in which case I use a can’t-reach-50 factor to estimate the CFM50. Values for new homes are lower, usually 750 CFM50 to 2,500 CFM50, due to better windows and doors, platform framing and use of sheathing panels instead of boards. Finally, homes that have been air sealed frequently achieve CFM50 figures of 250 to 750. The tightest homes test even lower.
The second calculation the computer shows is the ACH50 (air changes per hour at 50 Pascals), a value indicating how many times in one hour the volume of air in the house can be pumped through the blower door at 50 Pascals. The ACH50 value is one way to compare houses of different sizes. Older homes can have ACH50 values of 10 to 15; newer homes typically experience about 4 to 10 ACH50, and houses that have been air-sealed experience 1 to 3 ACH50. The Swedish standard for new single-family homes is 3 ACH50. The Canadian R-2000 program, a program for energy-efficient new residential construction, has a maximum leakage standard of 1.5 ACH50.
The third calculation shown on the computer is the effective leakage area (ELA), which combines all of the air leak holes in the house into one single opening. The ELA helps the user envision the size of the hole to be sealed. My own home has an ELA of just over 12 sq. in., or the size of a small, open window.
Estimating natural infiltration
The blower door test is conducted at pressure differences that exceed significantly the pressures a house experiences under everyday conditions. One method that’s widely used to convert blower door results to estimate natural infiltration was developed by the Lawrence Berkeley Laboratory. This method takes the ACH50 and divides it by a correlation factor that considers climate (average wind speed and outdoor temperature), the building’s height, its protection from wind and a leakiness correction factor that’s based on an estimate of the type of holes predominant in the home—small cracks (tight home) or large holes (loose home). In most cases this correlation factor falls between 14 and 20, so a home whose ACH50 is 10 would have a predicted natural infiltration rate of 0.71 ACH to 0.50 ACH.
This correlation is only an estimate, however, recent work in the northwestern United States comparted the correlated ACH50 calculations to tracer gas measurements of natural air leakage (one of the most accurate methods) and concluded that the correlation has a ±50% margin of error. I rely on the CFM50 figures calculated from the blower door test, which are good to ±5%, and give me a better idea of how one house compares to another, regardless of its size.
Sealing leaky areas
The contractor should have various air-sealing tools on hand when the blower door technician shows up so that many of the problem areas can be fixed right then. Tools for air-sealing include a foam gun, acrylic adhesive tape commonly used to tape air barriers, acoustical sealant, polyurethane caulk, polyethylene sheet and some scraps of rigid foam. The foam gun, the tape, the poly and the sealants are all available from the Energy Federation, Inc. (Editor’s note: Energy Federation Inc. (EFI) was absorbed into Franklin Energy/AM Conservation in 2024.)
Any exhaust fan, including dryers and range hoods, could draw some of its makeup air down the chimney of a boiler, furnace or water heater, a phenomenon called back drafting. So, when a weatherization crew conducts a blower door test, the crew should also do a combustion-safety test to make certain the house can be safely air sealed without increasing the risk of back-drafting into the house.
Picking the best time to test in new construction is a trade-off between having the wiring, plumbing and ventilation penetrations already in place and being able to get at problem areas to fix them. I think the right time to test is after the drywall is taped and before the interior trim has been installed. At this point, leaks around rough openings can be sealed, and any holes between the living space and the attic are still accessible.
To find leaks, I use a smoke generator. It’s a small Teflon squeeze bottle containing mineral wool and titanium tetrachloride (TiCI4). The TiCI4 combines with moisture in the air to make smoke that’s the same density as air, so the smoke doesn’t rise. I’m careful not to breath it—the smoke is corrosive and not recommended for lung maintenance. I squirt a small puff of smoke toward a suspected leak. If I’m in a space pressurized by the blower door, the smoke will find any leakage path where air is headed to lower pressure.
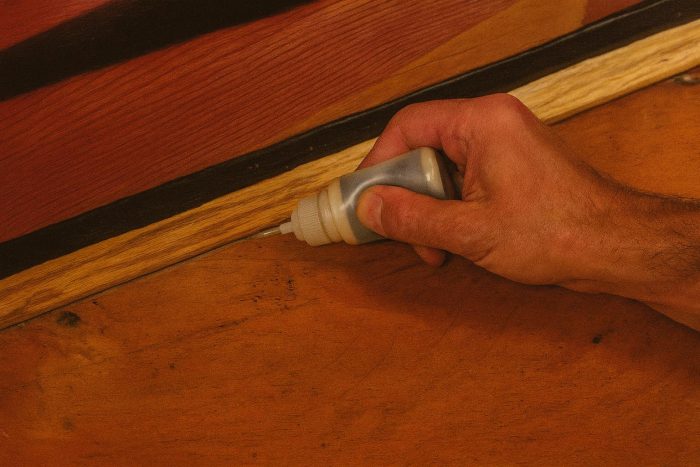
Because the biggest pressure differences are high and low in a building, holes in these areas typically leak more air than holes at the middle do. So, I concentrate a leak search at the attic and the basement.
I seal the high holes first. If the house has an unfinished attic, I depressurize the house (it’s easier to see smoke going out than blowing in) to 20 to 25 Pascals, go into the attic and blow smoke at all the potential air leaks sites. I pay particular attention to gaps around chimneys, duct chases, holes for plumbing stacks and wiring, attic hatches and recessed lights, lights and ceiling junction boxes. Other big leakers include dropped ceilings, kitchen soffits and knee walls in one-and-a-half story homes.
After plugging the attic holes, I reverse the blower door fan to pressurize the house and move on to the basement or crawlspace. Common leakage areas are the sill/foundation joint, the rim joist/sill joint and utility penetrations.
Finally, I find holes within the living area. I aim the smoke at potential leakage sites, such as the top and bottom plates of the walls (plates tend to leak), around windows and doors and electrical penetrations. It’s not uncommon to see smoke zipping into an electrical outlet on an interior partition wall. The wires may go up to the attic or to an exterior wall and then to an exterior outlet, or the leakage path may be more complex.
Other uses
As an energy consultant, I bring my blower door with me on troubleshooting calls. Using the blower door on houses with moisture problems, I can determine whether the problem is excessive moisture sources or inadequate ventilation. Assessing air leaks between the house and attic, for instance, can help locate the source of an ice dam, which often is produced by warming up the roof sheathing.
Blower doors can diagnose other building problems. Increased awareness of problems caused by leaks in air-distributions ducts, such as wasted fuel, indoor air pollution and damage caused by pressure-driven moisture, has fostered a number of ways to assess duct leakage with the blower door. In the simplest method, the air leakage of the house is measured twice, once with the grills and registers open and once with them sealed. This method is relatively quick but probably the least accurate. Minneapolis Blower Door has recently come out with the Duct Blaster, a small fan that assesses duct leakage directly.
Recently, weatherization specialists Michael Blasnick and Jim Fitzgerald of Philadelphia, Pennsylvania, and Minneapolis, Minnesota, respectively, have used the blower door and the space-to-space pressure differential measurements to assess how leakage occurs between heated space, buffer spaces such as attics, knee walls, and basements, and the outdoors. Their methods help determine where significant leakage is occurring in complex leakage paths.
Mark Roenbaum, P.E., owns Energysmiths, which designs low-energy use, environmentally sound housing. Photos by Rich Ziegner.
Weekly Newsletter
Get building science and energy efficiency advice, plus special offers, in your inbox.