
Blog
Window Installation Flaws – GreenBuildingAdvisor
EDITOR’S NOTE: This post is part of the Expert Exchange series, an editorially directed and expert-driven platform for information and discussion around leading-edge building science principles and projects. This series—made possible with support from our sponsor, Andersen Windows and Doors—is titled “Energy Smart Details for Windows and Doors.”
In our 37-year-old renovation company, we’ve had the opportunity to see and repair a lot of leaky windows. My current role as VP, Best Practices, includes complex troubleshooting and evaluations, and I’ve been able to learn from the mistakes of others (or even my past self, back from when I was a lead carpenter) as we have taken apart failed installations and seen what went wrong.
Any part of the exterior of a house can leak, and houses usually can’t handle water coming in through the roof, walls, or floors, so we need to build to prevent leaks. Generally speaking, its best practice to lap layers in a shingle fashion up the walls and over the roofs. The lower pieces are installed first, with higher ones lapping over them so that water is always directed toward the outside. We normally use two full layers—the one you can see (siding or roof shingles) and another layer underneath to catch anything that comes through (on walls it’s called a water-resistive layer, or WRB, and on roofs it’s ice-and-water membrane and roof underlayment).
Windows are one of the more complicated pieces in the building exterior. Unlike thin layers of siding or weather barrier material, which are easy to lap, windows are quite deep and penetrate all the way through an exterior wall. It’s challenging to lap materials around them shingle-fashion.
To shingle in a thick window, we put a “pan” underneath the window to catch anything that gets in through the window frame (or around the top or sides). We also tuck a little roof over top of the window head and tuck that back behind the water barrier layers so that any water running down the wall comes out over the top of the window instead of leaking in.
That’s the basic idea, but there are a lot of ways to get it wrong. Here are a few issues we’ve seen, or created, on our projects.
The Golf Course Window Rescue
A client called us and related a long, unfortunate story about leaky windows on the side of the house facing a wide exposed area (a golf course and lake). When strong storms blew in, water would leak into the walls. This even continued after the windows were replaced.


The windows were set close to the brick veneer. We realized there wasn’t room around the windows to rebuild water management layers, and with the numerous visible issues, even a perfect fix at the windows might not be enough because the flaws behind the brick would not be addressed with window work alone. So we recommended removing the brick veneer across the back of the house.

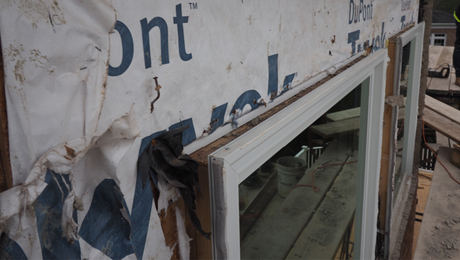
Problems with the brick, flashings, and WRB were numerous. The brick didn’t have enough brick ties, and there was a lot of mortar piled up behind it. There were no through-flashings at sills or near grade as required, and the attempted flashing at window heads was made of black plastic trash bags (shown in the photo above). Weeps were missing, and there were numerous tears and holes in the incomplete WRB installed on the walls.
The windows were not weather-sealed to the WRB on any side, they lacked flashings at top or bottom, and they did not have window pan flashings to direct water out. For some reason, many replacement units had been installed so that they projected 2 in. or so out from the wall, which only increased the amount of exposure to the outdoors and to the drain gap behind the brick.
Original units were installed on top of the WRB, so the heads of the units had a backward lap directing water behind the window unit to the indoors. Normally we tuck the window heads under the WRB at the top so that water is directed over the window instead of behind it.

We removed all the windows, replaced older units with new, and installed all of them properly with sill pan flashings, side flashings, and head flashings integrated with new WRB materials to direct water over the top of the units instead of funneling it inside.

We used two layers of WRB—a layer of fully taped Tyvek installed as an air barrier as well as a lapped water barrier, plus a layer of #30 felt, a durable and less-permeable option we feel is more likely to work well with masonry veneer in our climate.
The brick veneer was reinstalled with proper brick ties, correct through-flashings at code-required locations, effective weep holes, and drain cavity protection mesh to keep mortar droppings from blocking drain paths.

The house is now ready for the next decades with effective water management at the most vulnerable elevation, and all known issues were addressed in a durable manner.
The Window-to-Roof Integration
Some designs call for windows or doors to be installed within inches of a low-slope roof surface. Whenever possible, we integrate the roofing material into the window/door opening as the sill pan flashing material so there are no leaky joints or incompatible materials.

A repeated problem we’ve been able to identify and fix is when roofing is replaced but windows or doors close to the roofing are not removed. It’s common for the windowsill and side flashings to be cut during this process, and it’s very challenging to reconnect them to the roofing membranes, leaving a discontinuity that will readily leak water. Since these sills are in the splash zone, a heavy rain can quickly put a lot of water into the building.
One can “spray and pray” with a heavy caulk application, but pulling the unit and reconnecting the roofing materials to the sill pan flashings is the only reliable fix, so we usually recommend that for our relatively well-off clients, who would rather spend a bit of money than face the hassle of an ongoing leak and the attendant mold, cosmetic repairs, and rigamarole of having work done in their homes.

There have been times when removing a door or window reveals even more problems, as happened to us while trying to help fix a leaky condominium terrace door. We found that a previous door replacement had disconnected flashings from roofing, but also that the adjacent masonry wall flashings were compromised. Nothing we did to the door could solve the entire problem. Fortunately, the building management personnel understood the complex repairs needed and were able to handle the whole situation. Not all condo management folks can handle a three-trade repair that involves water leaks and complicated sequencing of repairs.

Old School and Not So Cool: The Early Days of WRBs and Window Water Management
After reading some books in the ’90s, I advocated using extra layers of WRB and some housewrap tape to attempt to weatherproof windows on some projects I ran at the time. It’s laughable now, but back then there was a fair amount of pushback and quizzical looks at these very unusual extra steps I was forcing into the process.

We revisited one of these projects years later. The wood casings on the north side of the house were starting to show signs of rot, despite the “lifetime coating and wood treatment” promised by the window sales guy. Replacing the trim was simple enough, and it gave us the chance to see how the wrap had held up.
Overall, it could have been worse, with little damage to the framing, but it was clear that water was having its way with both the WRB and the tape. Both materials were intact, but the tape was not fully stuck in place (to be fair, at the time we didn’t know the importance of rolling or otherwise activating the pressure-sensitive adhesive of the tape), and the WRB was stained and obviously letting water in at any untaped laps, not to mention the thousands of staple holes we had poked in it before we found out about cap nails.
Another project we did in the ’80s had even less protection and even worse window rot. (The windows were not as good, and there were no overhangs at all). However, the WRB had done a reasonably good job protecting the framing behind it—at least where we had covered the framing with WRB.

All in all, things could have been worse, but the thick, sticky, self-sealing, and corner-covering window flashing tapes we’ve been using for over a decade are much better than these well-meaning but primitive wraps.
Windows are tricky to install in a leak-resistant manner, but the materials and techniques we have these days are pretty solid, at least in my relatively mild climate. The lessons we’ve learned are mainly that we have to take water management seriously, understanding that a “shingled in” installation for a window is a different animal than simpler materials that don’t project through all the other layers we use. A complete “sill pan” of flashing tape that slopes to the outside and has drain openings to release water goes a long way and handles things I didn’t get into, like the surprisingly common leaks at the corners of wood or clad wood window units, or condensation that can happen in rough openings. We use tapes, sealants, and metal flashings to keep water out of the sides and tops, and we lap layers shingle-style so even when adhesion fails we have a good shot at directing water out. When we miss with any of these steps, problems can result.
Doug Horgan is vice president of best practices at BOWA, a design/build remodeling company in Washington, D.C.
Weekly Newsletter
Get building science and energy efficiency advice, plus special offers, in your inbox.