
Blog
Foam Shrinks, and Other Lessons – GreenBuildingAdvisor
Editor’s note: This article originally appeared in Fine Homebuilding Magazine, Issue 225, back in February/March of 2012.
I did a deep energy retrofit on my barn 16 years ago. Building Science Corp. was young and growing, and we needed a bigger office. The barn would be that office for the next 10 years. In fact, Betsy Pettit wrote about it in “Remodeling for Energy Efficiency” (FHB #194).
The first thing we did was to cut all the overhangs off the barn roof and wrap the outside of the building with plastic. Next, we applied 8-in.-thick expanded polystyrene (EPS) foam on the walls and 10 in. of EPS on the roof. On top of the roof, we installed a layer of plywood as a nailing base for the shingles. The plywood cantilevered past the edge of the barn’s roof to form the new overhang.
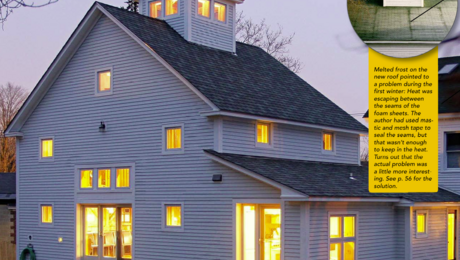
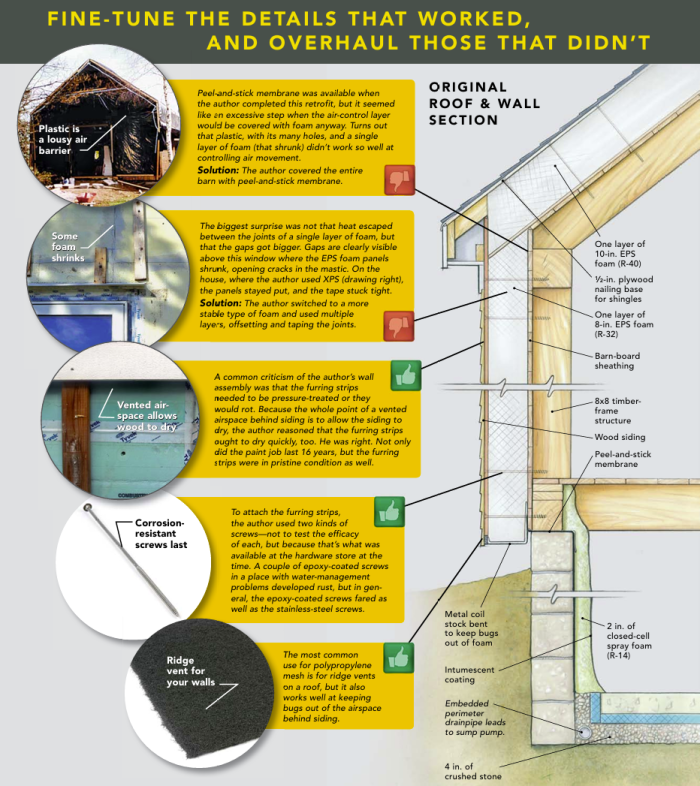 Our first lesson came about four months after the retrofit was complete: When the first frost hit the roof, I discovered an obvious melting pattern. At the seams between the foam panels, warm air was escaping and melting the frost. Rather than installing one thick layer of foam, I should have installed multiple layers, offsetting the joints and staggering the seams. I decided to fix that when I replaced the shingles. I was curious about a few other things:
- We had carpenter ants, which indicated a water problem. I couldn’t figure out where they came from exactly, but I knew that I wanted to hunt them down and find out what was going on.
- The air-leakage test revealed that the barn wasn’t as tight as I thought it should be. I wanted 1.5 air changes per hour (ACH) at 50 pascals, but what I got was 3 ACH. We haven’t retested with a blower door yet but testing on similar buildings with this same retrofit system have netted excellent results: 0.1 ACH at 50 pascals.
- I wanted to know whether I had any other bugs living in the furring-strip space between the siding and the foam sheathing.
- I wanted to know how my water management actually worked. You can’t really tell with computer simulations.
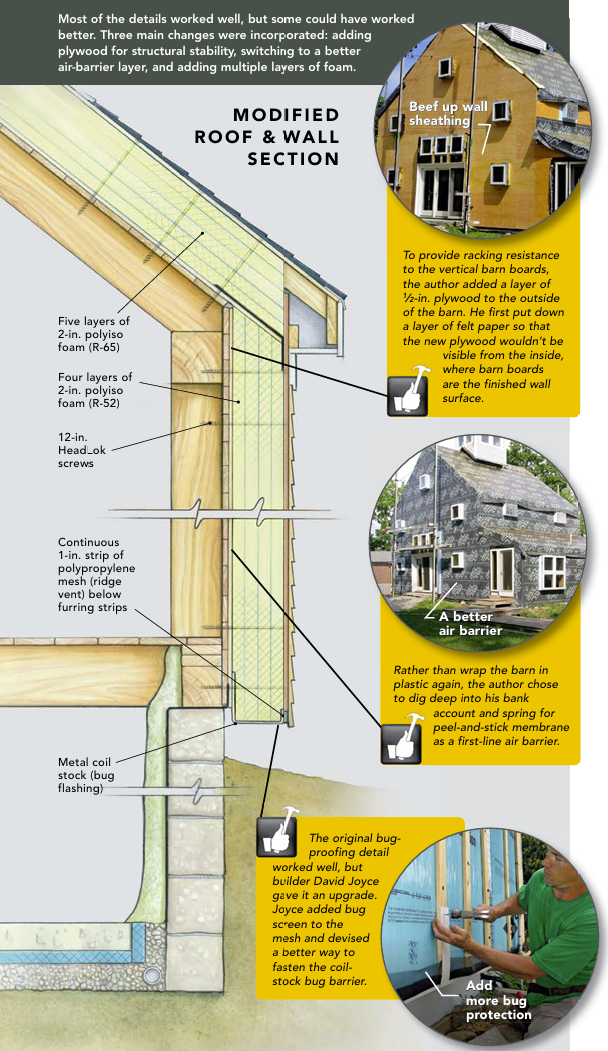
Clearly, there were more issues with this building than just the shingles and the foam, and they have been nagging at me for more than a decade. I decided to look at the project like an experiment—take the barn apart, see how the components performed, and then put it back together again using the best off the-shelf technology available now.
Beginning at the outside, I’ll take you through what we learned.
Paint can last a very long time
There was nothing special about the siding we had chosen for the barn except that it was installed over a vented rain screen and we were meticulous about sealing cut ends. The siding is lodgepole pine from Alberta. It was shipped to New Brunswick, where it was kiln-dried and then coated on all six sides with a penetrating wood preservative. Next, it was coated on all six sides with an oil-based primer and painted with acrylic-based latex paint. It was then shipped to Massachusetts as “Cape Cod” siding. We installed it over 3⁄4-in. furring strips, which allowed air circulation behind it. This meant that the siding could dry evenly in front and in back. When we took the siding off the barn, it was pristine. The trim, also lodgepole pine treated the same way, did not hold up as well in some places. The trim was not back vented like the siding. Instead, it was nailed directly to 3⁄4-in. plywood strips.
The bug screen worked perfectly
Installing siding over furring strips is a water-management strategy that keeps siding and walls dry and free of rot. I can’t tell you how many times over the past 16 years that someone has said to me, “You can’t do that. There will be animals and bugs up there, and they’ll eat your house.” When we took the wall assembly apart, however, there was absolutely no evidence of bugs, bees, or other critters living in the space between the 1x4s. We kept critters out by wrapping a 3⁄4-in. strip of attic ridge vent called Cobra Vent at the bottom of the siding. We’re rebuilding it in much the same way, but with slightly more advanced materials.
Epoxy-coated screws perform as well as stainless steel
We used two kinds of screws to fasten the thick foam panels to the barn boards: stainless steel and epoxy-coated steel. When we opened the walls, all the screws looked brand new except for two of the epoxy-coated screws. Those two screws were in a place where we had some water-management problems, and the heads had rusted out.
In the past 16 years, the technology of epoxy coatings has improved significantly, so I have no reservations about using epoxy coated screws on the rebuild. At about 35¢ per screw versus $1.50 for stainless steel (2012 prices), this is an easy choice. I have absolutely no hesitation in recommending epoxy coated steel screws and non-pressure treated furring strips.
Furring strips will not rot
I can’t tell you how many times I have heard, “You’ve got to use pressure treated furring strips,” but it is absolutely untrue. When we took the walls apart, the furring strips looked brand new. Why does this detail work? Because the vent space is designed to dry. That is its whole job.
Why not use pressure-treated furring strips as an added measure of protection? One reason is that it means having to use stainless-steel siding nails, which has proven to be an unjustified extra expense.
Stagger the sheets and choose the right foam
When I took the photo of my frosty roof on the opening photo, I thought the heat loss was the result of using a single layer of foam, which meant that I couldn’t stagger the sheets and offset the seams. That is what I’ve been telling people all these years in my confessional speeches about deep-energy retrofits. That, however, was only part of the problem. Now I know the rest of the story.

When we installed this foam, we covered the joints with mesh tape and mastic. Over time, the panels shrunk, and the tape/mastic combination cracked, opening the seams. This is where the heat came through to melt the frost on my roof. Because we used XPS on parts of the main house, we dug into that siding to compare the EPS with the XPS, which was sealed at the seams with Tyvek tape. After 16 years of service, the XPS and Tyvek tape were in perfect condition.
Peel-and-stick membrane sags
Interestingly, we also learned something about Bituthene membrane (peel and stick). Some of the peel-and-stick membrane that we used to flash windows wrinkled over time. Specifically, the pieces running horizontally above window head flashings sagged along their top edge. Anywhere that we didn’t seal the top edge with contractor’s tape, the peel-and-stick membrane sagged. This meant that water could get in and cause problems. Wherever we taped the top of the membrane, water couldn’t get in. Some folks in commercial construction call this a termination layer and use glue, sealant, or some type of tape. Now we specify that all the tops of this membrane should be taped.
Plastic is a dumb air barrier
In the 1980s, I was preaching all over Canada about plastic being a dumb air barrier. What did I choose to wrap my barn with? Plastic. It was cheap, and I was overconfident. The blower-door test years later didn’t specify where, but it told me that there were a lot of holes. Rather than try to figure out where all the holes were and detail the plastic layer better, I switched to covering the barn in peel-and-stick membrane as the first line of defense in my air-barrier system.
Note: This plastic air barrier is different from a plastic vapor barrier that is commonly (and often wrongly) installed in roof and wall assemblies.
Window film is a poor substitute for the right glazing
At the time of the deep energy retrofit, we used the best windows we could buy: triple glazed Heat Mirror windows from Hurd. The third layer of glazing is a film suspended between the two layers of glass. The performance was pretty good, but the longevity of the inner layer of film was not so great. After 16 years, I can see fisheyes on the film—not enough to make me want to replace the windows, but enough to keep me from specifying window film in the future.
Flashing matters
One of my missions was to hunt down the carpenter ants that I knew were chewing up my foam. I found ant galleries in three distinct locations. Each place was adjacent to an area with a water-management problem. In two places, there was reverse-lapped flashing. The third place was up on the roof: The cupola’s windows are at the same height as the roof peak. This is a dumb design detail. The windows should have been placed higher than that, and they are now.
How did the ants get to these areas? They crawled up. Ants crawl all over the place on reconnaissance missions. When they find a water source, they dig in. As irritated as I was that the ants were eating my foam, I was glad to find the ants localized in places with water problems. I am absolutely embarrassed about the water-management details. Two of the spots were reverse flashed on a day when neither my architect nor I was on the job site.
Bottom line: If you don’t screw up your water management, then you’re not going to have ants.
Cantilevered window boxes won’t sag over time

Here’s another question that I have been bombarded with for the past 16 years: Won’t those window boxes sag? When I talk about this window detail (called outies by the energy nerds), I often get questions about whether the boxes will sag under the constant weight of the window. I have always answered this question by saying that the window boxes on my house hadn’t seemed to sag so far. Now, after having had the barn stripped of its siding and foam, which gave me the opportunity to measure the deflection, I can say unequivocally, “No, they will not sag.”
Editor’s Note: I contacted Joe in preparing to republish this piece to see if he had any comments or additional details he wanted to share. He mentioned the original triple pane windows with the heat mirror film were replaced with triple glazed krypton filled glass windows, which he said were purchased from Lex Luthor (Joe’s sense of humor). An Energy Recovery Ventilator (ERV) was also added in the years since the renovation.
Joseph Lstiburek is the founding principal of Building Science Corporation, buildingscience.com Corporation and Lstiburek Consulting Inc. (In 2023, ownership of Building Science Corporation was passed on to the most senior principals of Building Science Corporation.) Photos by Daniel Morrison, except where noted.
Weekly Newsletter
Get building science and energy efficiency advice, plus special offers, in your inbox.